Friday, 15 May 2015

Sourdough Revival

I recently wrote about my struggle with a new sourdough starter. Having never really made sourdough before (well, not successfully, at least), I wasn't sure what I was doing wrong, but certainly my starter didn't seem to be particularly strong.

After much research and some experimentation, I worked out that the likely cause of my starter's feeble constitution was that I wasn't keeping it as warm and cozy as it would prefer. According a Sourdough Starter article on Wikibooks, the optimum temperature for the growth of Lactobacillus sanfransicensis (one of the two main yeasts which are responsible for the rising properties of a sourdough) is about 32°C. Well, I certainly wasn't keeping my starter that warm!

So, at the beginning of the week, I tried putting George (my sourdough starter) on the windowsill in my utility room (which is basically a glassed-in side-return of the house and which is south-facing so it gets very warm in there) on sunny days or in a coolbox with a nice snuggly warm hot water bottle next to him on cooler days. Sure enough after a few days of this luxury treatment, we reached the magical day (yesterday) when George doubled in size as a result of being fed (well, I think he did. I worked at the office rather than at home yesterday, so am only guessing by the marks on the side of the glass jug, but my other half pointed out that those marks might well have been where I scraped the mixture down the side of the jug).

Anyway, last night I made a sponge according to Hugh Fearnley-Whittingstall's recipe on the Guardian website. This morning, the sponge was indeed springy and bubbly, so I joyfully made a start on the dough - giving it a good, solid knead - then I left it in the kitchen to rise. At lunchtime, it still hadn't risen much, so I moved the dough to that nice warm utility room I mentioned. At about 4pm today, when I went to make a cup of tea, I took a peek and decided it had probably doubled. I turned the oven to its lowest setting and let it warm up (to about 50 degrees) while I knocked the dough back, shaped it and placed it into an Ikea food saver lined with a flour-dusted tea towel. I covered the dough in an oiled plastic bag and put it in the oven (on a cork mat so I don't melt the plastic tub and with the oven now turned off). By my estimation, the loaf should have doubled and be ready to bake by about half past six, just in time to have fresh sourdough with dinner. Fingers crossed!

Wednesday, 22 April 2015

The Struggle Of The Sourdough

I love sourdough bread. I also love baking. So, it's a no-brainer, now that I can work from home and know that the work for sourdough is ten minutes here and five minutes there, that I want to try. What's not so much of a no-brainer is getting it right! 

I had a go at making a sourdough starter about this time last year, but life got busy, I couldn't work from home at that point and after a while I chucked it out, assuming it had died. I've since learned, that it's quite possible it hadn't died and I may have been able to revive it, but I didn't know that at the time.

A week or so back, I decided to have another try and found myself a likely looking sourdough starter recipe. The recipe seemed to work; the starter certainly had plenty of bubbles on the surface on day 3. So, on day 6, when the recipe suggested that the starter should be ready to bake with, I found a sourdough bread recipe and got cracking.

The starter seemed active, with lots of bubbles and it certainly rose well at first. But when I knocked the dough back it didn't seem to rise any further. The resulting bread was dense. So dense it was vaguely reminiscent of Dwarf Bread, in fact.

I've read stuff here and there since then and at the moment my starter is out on the kitchen counter waiting for its second feed of the day (in an hour or two). I can't bake tomorrow, but I'm thinking I'll start off a batch just before I go to bed tomorrow night and let it rise in the fridge overnight (which, from what I've read, should mean it has a better sour flavour). We'll see....!

Friday, 11 October 2013

Cross stitch


I recently promised a "proper blog post" about my resuming attempts to learn cross stitch (after a hiatus of more years than I care to count!).


It came about in Sicily recently, as it happens. While I was there, I learned about "sfilato Siciliano"; a form of complicated embroidery which involves cutting some threads of the base material to create designs with voids, which at its most complicated resembles lace. I expressed an interest in learning how it's done but it's not something which would be quick to learn and so I was given a cross stitch project to start me off (and, I suspect, as a test of my interest, attention to detail, aptitude and tidiness).


The project is reasonably simple; a border of Aida fabric and instructions for how to create a repeating ladybird (ladybug) design. The instructions are in Italian, but fortunately the picture, is more important than the text in this case.


So far I'm pleased with what I'm achieving; I'm learning how to count! OK, so I already know how to count, but with cross stitch it's important to count the stitches in the design accurately. Centering the design correctly is also important (and a matter of counting). And I'm learning all the basics of cross stitch to boot. Of course I learned as a child, but I remember finding it baffling, somehow, that you first did all the stitches on a row in one direction, and then all the stitches in the other direction, rather than making each little cross individually (I guess I must have been very, very young!)
I like how this piece is beginning to look. There's a lot of work to go, yet (this border is 130cm long) but I've already got a plan for it once it's finished. Oh, and I'm thinking I might liven up the design a little by scattering the odd red ladybird in among the yellows.

Thursday, 10 October 2013

I'd rather be crafting!

I've been so busy recently that I've had hardly any time for arts and crafts, let alone blogging about it!

I did recently have a little go at cross stitch (proper blog post to follow soon) and it got me eager to get my teeth into tapestry by making a cushion. I've also been dying to find the time to have a go at patchwork (something which has always seemed complicated and thus felt daunting to me).

I'm also aware that Christmas is approaching and although I've had a couple of ideas for card designs, I've yet to implement any of them.

A few weeks ago I discovered that there is a huge hobby shop nearby and I couldn't help but find it inspiring when we visited.

There are so many things I want to be able to try. Here's hoping I find time soon!

Thursday, 4 July 2013

Lunchtime sketching

This lunchtime I dug out my sketchbook and popped along to Finsbury Square Garden for a spot of people sketching.

The first guy I saw who seemed to be still enough for me to complete a sketch was lying on the grass, enjoying the... well it was cloudy so he wasn't enjoying the sun, but the warmth at least. Unfortunately he kept crossing and uncrossing his legs, so it was tricky to get his legs, right. I'm reasonably happy with the result, though.

Enjoying the lack of sun

Then the next person I picked on was holding a phone to his ear with his shoulder and sitting cross-legged with his back to me. I liked the way that his attempt to hold the phone to his ear contorted his back into an interesting shape. In fact, he looked pretty uncomfortable! I'm not sure I really captured the shape of his back very well, though.

His back doesn't look so contorted here

People were beginning to go back to work by the time I finished that sketch so my choices were getting more limited, but the last person I found was a chap who was propping himself on one elbow and writing. His legs were away from me and hidden from my view by his torso. Unfortunately, that's not quite how the drawing looks; it looks like I simply couldn't be bothered drawing anything below his waist. Also, that thing in front of his hand was a cycle helmet, but he got up and walked away before I had a chance to finish drawing that.

This man did have legs... really... he did!

I've enjoyed my little foray into life drawing this afternoon. In fact I'd quite like to see if there are any life drawing sessions I could join without needing to commit to a ten week class or whatever. If you know of a central or East  London life-drawing drop-in session of some sort, please do let me know!

Sunday, 23 June 2013

Sketchy details

Hmm.... it's been a while, hasn't it? Sorry. I've been doing creative stuff, but nothing new. And you don't want to read about me making more owly towels, do you? Of course you don't!

Well, one of the things I've been doing, which I've not written about here yet, is that I've been playing with SketchUp. And I do consider it playing; it's something I can do for fun, for hours on end, without getting bored. Some people play World of Warcraft, I draw stuff in SketchUp. It's a pretty powerful tool and I'm sure that some people do consider it work - but what a wonderful thing it would be to be paid for playing with SketchUp!

In case you're not in the know, SketchUp is a 3D modelling application. I first discovered it when I was designing the kitchen for my current home. I loved being able to visualise what the kitchen would look like when it was finished. More to the point it was very helpful for me to be able to see that the red worksurface that my parter liked the idea of so much would look amazing (rather than... um... a bit too out-there for my taste!)

Since then, I've used SketchUp for all sorts of things! I've modeled most of the furniture in our house as well as the floorplan of our house, which made life easier when re-arranging furniture (why heft 600kg of sofa around the room, breaking your back, only to find it doesn't fit where you thought it might, when you could come to the same conclusion with a few mouse clicks?) I lost many of my SketchUp models when our laptop was stolen a few years ago; I was so upset! I now save all my models on Dropbox so that at least if something happens to the computer I don't lose them.

We've been planning to move house recently and SketchUp has been a great way of getting a general idea of how we might use the space in the house we've found. For example, I was able to experiment with the idea of knocking through the kitchen to the second reception room of our new house, to create a big kitchen-diner.

SketchUp model of a kitchen.
Not so kitsch.
We recently bought an Art Deco hall stand at a fleamarket. We fell in love with it when we saw it and think will look beautiful in our new house. I just had to SketchUp it so that I could include it in models of the new house to see how it looks.

SketchUp model of a 1920s French Art Deco Aluminium Hall Stand
Love at first sight!


Sometimes I just like to model an item for fun. The Ikea catalog can be a good source of inspiration for this sort of thing because it gives some good information about the size of items.

SketchUp model of an Ikea desk.
An Ikea idea.
There are things which frustrate me about how SketchUp works. For example, it seems totally illogical to allow users of a 3D modelling tool to place guide points in a model and still have things stick to other items, rather than the specifically placed guide point, as a default. But the frustrations are small and the rewards are huge, so I try not to get too agitated when I'm struggling.

A skill I think I should develop in the near future is that of creating texture files. There is a good pool of materials in SketchUp, but I always seem to find that I want a particular kind of material which isn't available. I usually end up making do with an existing material, but it'd be liberating to be able to open a drawing application, create a texture, save it as a graphic file, import it to SketchUp and get exactly the look I wanted to achieve.

Tuesday, 11 June 2013

Soda bread

One of the things I love about having a flexible working day is that, on those occasions when I work from home, I can slot in little jobs around my work. Today, for example, rather than spending 15 minutes chatting to colleagues while making a cup of tea, I made a loaf of sundried tomato and chili soda bread.

Close up of the soda bread.
A moody close-up.

I've made soda bread once or twice before, but this is the first time I've played with the recipe at all. The basic recipe is 250g plain wholemeal flour, 250g plain white flour, 1 teaspoon of salt, 1 teaspoon bicarbonate of soda and 420ml buttermilk. I've never really found a good source of buttermilk, so I just mix the juice of half a lemon into the milk to sour it, which seems to work well. Soda is probably the simplest bread to make because there's no kneeding or prooving or knocking back or faffing of any kind involved; essentially you just mix the wet ingredient into the dry, cut a cross in the top and throw it in the oven for half an hour.

I varied the recipe by adding about a quarter teaspoon of chili powder, half a teaspoon of smoked paprika and about a teaspoon of oregano to the dry ingredients before I sieved them and then finely chopping five sundried tomatoes and one red chili to add at the same time as the faux buttermilk. Once I'd mixed the dough, turned it onto a floured board, shaped it briefly and transferred it to an oven tray, I cut a deep cross in the top of the loaf (this is the traditional look, but it also helps what is really quite a soggy dough to cook all the way through). I finished the loaf by sprinkling some grated cheddar on top (because, let's face it, most things taste better with cheese on top!) and into the oven it went. Within fifteen minutes of getting the flour out of the cupboard, I was back at my desk with my cuppa and the loaf was baking.

Half an hour later, when the oven timer sounded, all I needed to do was pull the loaf out of the oven and slide the hot loaf onto a cooling rack.

Soda bread loaf with sundried tomatoes and three red chilis.
Gratuitous ingredienting.
The loaf will keep for up to three days in an airtight container (always assuming we don't finish it before then!), should still feel fresh tomorrow and will toast nicely at any time.

Close-up of the cross-section of the loaf.
Chunks of sundried tomato and chili are nicely spread through the loaf.

For those who prefer their recipes in the standard format, here you go:

Ingredients:
  • 250g plain white flour
  • 250g plain wholemeal flour
  • 1 teaspoon salt
  • 1 teaspoon bicarbonate of soda
  • ¼ chili powder (more or less, to taste)
  • ½ smoked paprika
  • 1 teaspoon dried oregano
  • 420ml buttermilk (or milk soured with the juice of half a lemon)
  • 5 sundried tomatoes, drained and finely chopped
  • 1 red chilli, seeded and finely chopped
  • grated cheddar for the topping

Method:
  1. Preheat the oven to 200°C
  2. Sieve the flours, salt, bicarbonate, chili powder and paprika together then mix in the oregano.
  3. Add the chopped tomatoes and chili at the same time as the buttermilk and bring together to form a very sticky dough.
  4. Turn the dough onto a floured board, bring in the sides of the dough, folding and turning it to shape it, but do not kneed it.
  5. Move the shaped loaf to a baking tray lined with baking paper.
  6. Cut a deep cross into the top of the loaf.
  7. Sprinkle some finely grated cheddar.
  8. Bake at 200°C for 30 minutes.

Sunday, 2 June 2013

Dream a little dream

Yesterday morning I woke from an incredibly vivid dream of flying over a lush rainforest, towards a gorge. I flew over and into the gorge, under a natural bridge formation created by the collapse of a cave and down to land on the bank of the river below. But the bank was crowded with totem poles and huge wooden hands, the fingers of each having been carved and decorated like the totem poles. I clearly remember the feeling of being dwarfed as I sank down between the monumental wooden fingers and amazed by their scale and decoration. I also very clearly remember that there was a haziness and humidity down amongst all that carved wood; between evaporating river and a nearby waterfall, it was hard to see and hard to breathe.

The dream was so clear to me that I wanted to draw an image from it straight away, This was the result.
A gorge in a rain forest with totem poles and giant wooden hands on the banks of the river.
Image from a dream: Caran D'ache and pencil on cartridge paper.

The dream is still quite clear in my mind so I hope that there will be more sketches to come.

Saturday, 25 May 2013

What's for dinner?

We had a load of veg in which needed using. Living with an Italian, a minestrone was an obvious (and healthy) choice. We had half a head of sweetheart cabbage, a handful of new potatoes, some bedraggled french beans and plenty of shallots and mushrooms. We've pretty much always got carrots and celery in the fridge and peas and baby broad beans in the freezer. Add to that little lot, a packet of pancetta, a few bay leaves, a squeeze of tomato puree, a splash of white wine and a load of water, boil it for an hour or so and Bob's your uncle.

So, what goes with soup? Why, bread of course! I cheat a little when I make bread. I've a bread maker so I tend to let it make the dough for me. Today I made sesame and caraway rolls and pesto, sundried tomato and olive tear-and-share.

Grub's up!


How can a day off work mean I've no time for creativity?!

Yesterday was a bit frustrating. I'd taken the day off work because I had a few little jobs I wanted to get done. I had hoped that it would also allow me a little time to do some more crafty or creative stuff. But my failure to see exactly how many "little jobs" I had to do and how long they would take meant that I didn't get any time to do creative things at all!

So, this morning I was determined to get the creativity in good and early! I wanted to do a more permanent version of the Dessy Weather sketch I drew the other day. On opening my sketch book, I found a couple of cartoons I'd done a few months ago.

This first was an idea which came to me and I sketched very quickly, but never really developed (I really should one day).


And this one is another cat-themed one. (Um... I like cats quite a lot. In fact, I'm probably borderline crazy-cat-lady.)


And finally, here's the developed Dessy Weather cartoon.

Wednesday, 22 May 2013

Sketchy

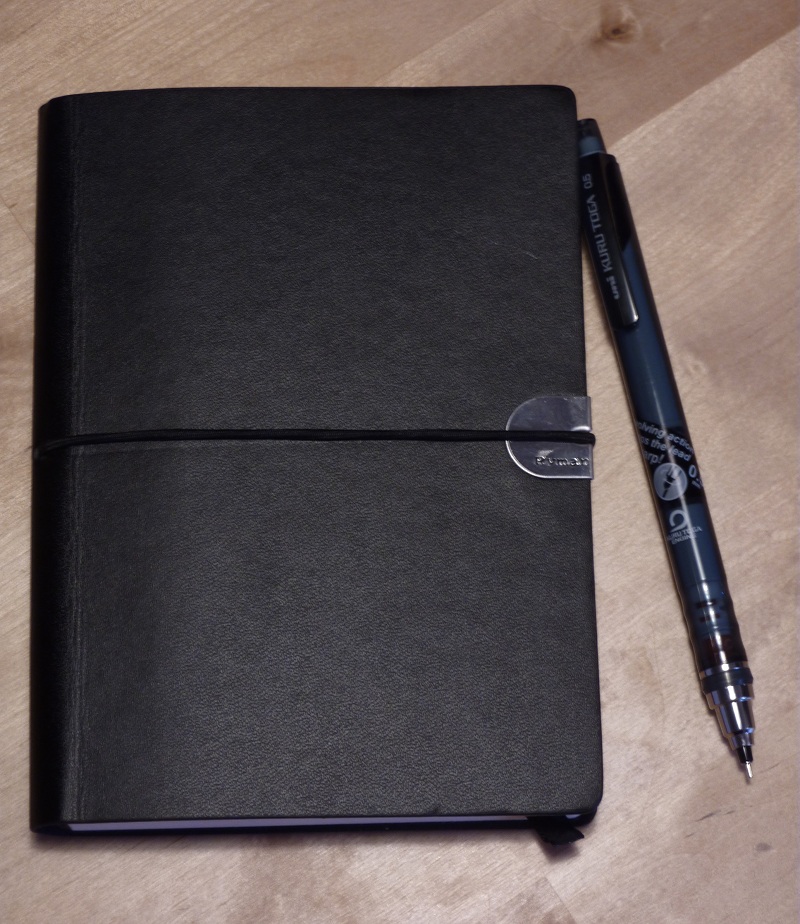
Yesterday I bought myself an A5 sketching notepad and a mechanical pencil that I hope will be reasonably robust. The intention is to keep them with me at all times so that when inspiration hits, I can be ready to sketch. I've always wanted to do this, but for some reason never have. Incidentally, the pencil is very cool - the lead turns just a fraction each time you touch it to the paper so that it wears evenly to remain sharp; technology, huh?

Ryman A6 sketch book (80 pages) and Uni Kuru Toga 0.5 mechanical pencil

I had fun with my new purchases straight away yesterday lunchtime, starting off with some inspiration from the tree at the junction of London Wall and Moorgate.

Sketch of a tree in spring
Number 9 - The Larch

Then very quickly I reprised some old friends from many years ago, the Inskip cow and sheep (the pig was added later and I've not drawn a pig before, hence it being a less well developed drawing).

Moo Baa Baa Oink
The crazy-eyed cow and grass-munching sheep were originally from a card I sent to friends many years ago when I stayed (very briefly) in an extremely small village in rural Lancashire

After work, I went into town and while waiting for a friend, I took some inspiration from the flowers in windowboxes and borders.

Lavender, foxglove, ivy, pansy, pink and some stylised flowers
Flowery

Later, on the tube home from a night out, I decided to develop yesterday's ice cream idea further, making the ice creams more individual.

More individual versions of yesterday's ice cream sketch
I Scream. Again.

Even this morning I've been busy. A toad on BBC Breakfast made me draw him.

A toad
Toad out of the hole

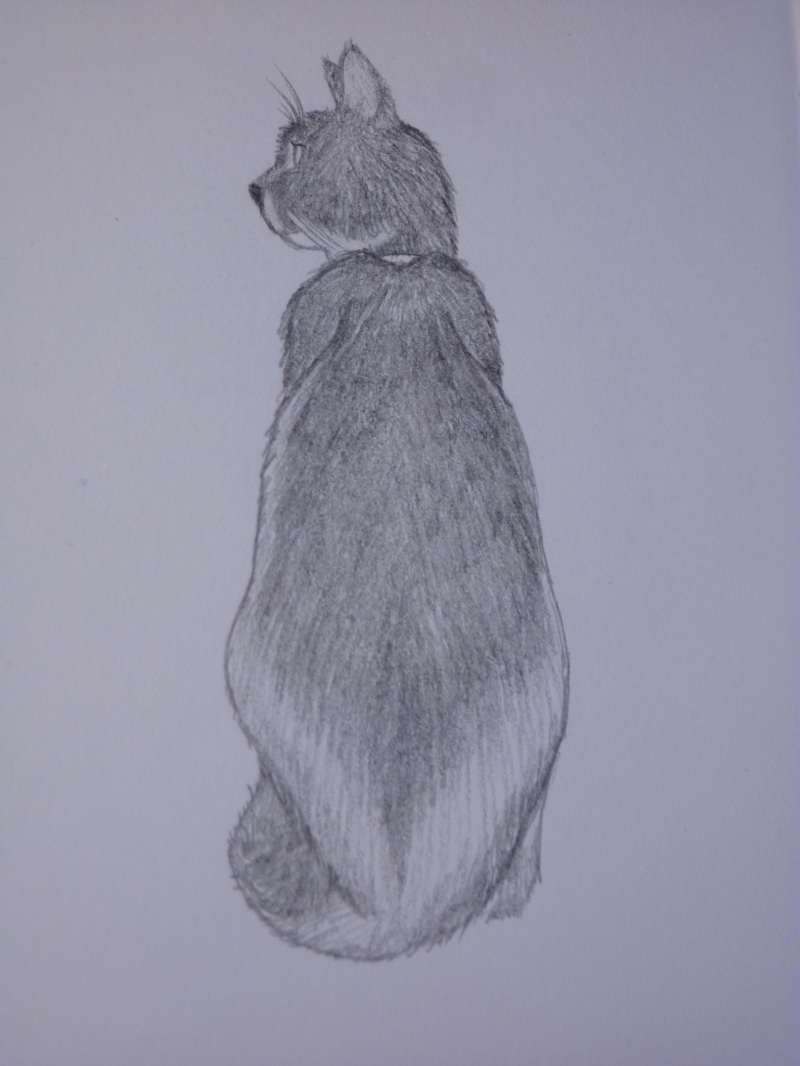
And then my Gosh!, one of our cats, came and sat on the back of the sofa with her back to me. The sheen of her coat and the shape of her shoulders and hips really called to me. I'm particularly proud of this sketch (although if I were to be critical, I'd say that her top lip is just a little too long in this sketch and her tail a little floofier than IRL).

Sketch of a cat with her back to me
Gosh! pretending she isn't keeping an eye on me

Tuesday, 21 May 2013

Oh summer, where art thou?

I'm feeling the need for summery designs at the moment. So on the train into work this morning I doodled this.

It might end up as a linocut print; maybe even on a t-shirt!

Oops, I dropped my ice cream
I Scream

Monday, 20 May 2013

The fabric of creativity

I'm inordinately excited to have found out about the existence of fabric painting media. Until yesterday, I had thought that painting on fabric required specialist fabric paints or crayons like those I had as a kid. They did the trick, but they really gave quite a basic result.

As a result of the lino printing workshop yesterday, I have discovered, however, that it's possible to buy media that you mix with standard acrylic paint which allows you to paint or print onto fabric to provide a result which will resist washing even in a washing machine. I've always liked using acrylic paint, not least because it's affordable and quite easy to find even in the most basic arts and crafts shops.

Today's research has also enlightened me to products which you can use to create screen printing stencils. Again, I did a bit of screen printing when I was a kid, but it involved cutting a stencil out of paper which had a great many limitations (not least that it would apply ink to the thickness of the paper used).

I sense a whole world of fabric printing opportunities opening up in front of me. My life may never be quite the same ever again!

Sunday, 19 May 2013

Owly Towel

Sounds like a Fawlty Towers anagram, doesn't it? But in fact, it's what I've been making today!

Thanks to the lovely Craft Guerrilla's expert guidance, I've spent three hours this afternoon carving a design out of lino and then printing it onto a tea towel. I've had so much fun and - as is always the case when I learn a new craft or technique - my mind is now buzzing with possibilities. Let's just say that if you're on my Christmas card list, I'm already thinking up the design you'll be seeing in seven months.

The workshop was at the Knit With Attitude shop at 127 Stoke Newington High Street and there were four of us participating in the workshop including Louise (Crafty Guider) and Jean-Mary (Meanyjar).

As I wrote yesterday, I'd had an idea in mind for a while, of a little owly chap sitting on a branch. When I got to the workshop, I realised that in fact for a repeated design, the owl would be better on its own, without the branch.

So, I started out by drawing my li'l owl onto the lino block.
The starting point is th draw the design onto the lino block.
Owly. HB pencil on lino.

Then I set about carving! It was lots of fun gouging out chunks from the lino. I loved that the different blades of the tool had different influences, not only the shape and weight of the line, but also the direction; I'd intended that the eye sockets would be tooled from the outside edge, inwards, but the blade I was using gave the line a natural curve to the left, so they ended up with a spiral design which I love.
The half-finished design.
Shavings of lino ended up all over the place; this is not a hobby for those who don't like mess.

Once I'd finished the design, it was time to ink it up and print a trial run on a scrap of fabric. I'm very into teal at the moment, so I decided on a good, strong teal colour, which I used by mixing a lot of blue, with some yellow and white. The 'ink' was actually acrylic paint with some Daler Rowney System 3 Acrylic Medium mixed into it; the ratio was imprecise, but it seemed to be about 10-20% medium to paint. The medium means that the paint doesn't dry quite so quickly as acrylic paint normally would, allowing you more time to work.
The first trial print.
No negativity here!

The first trial print helped me to realise that I needed to shave away a little of the material around the design. In fact, in the end I cut it all away, because I wanted a nice clean edge to the design. Once I was happy with the design, it was time to commit to printing my tea towel. I measured the towel and my design and worked out I that I could fit a row of four owls along each short edge of the towel.
The finished towel.
Four in a row.

I had great fun creating my owly towel and it was inspiring to see the designs my fellow workshoppers came up with.
All of us, with our printed towels.
From left to right, Craft Guerrilla, Alison, me, Crafty Guider and Meanyjar.

Saturday, 18 May 2013

Logos-a-gogo

Today I created the Pinking Shears logo and favourites icon. I used Word Art and the drawing toolbar in Microsoft Word. Lots of people pooh-pooh Word's graphical capabilities and it does have its limitations, of course, but once you've learned how to use them, there's a great deal of flexibility. I've been a fan of the drawing toolbar of Word since the first time I played with it (which, if I recall correctly, was in the 1990s with MS Word version 2!)

The pinked effect is a lot of small triangles, lined up together and grouped, then rotated as a group with the free rotate tool. The words Pinking and Shears are separate Word Art items. I played around quite a bit with different colours and shades, different shape of Word Art. In fact, the only constants were that I wanted to use my two favourite fonts, Calibri and Cambria and that I wanted the teal-and-orange combination. I had originally rejected the idea of using pink in the design when it was suggested by my partner this morning, but as is often the case, I soon realised she was right.

Once I had something I liked, I did a print preview and used Snag It to grab exactly the part of the screen that I liked, and convert it into a png format file.

Friday, 17 May 2013

Leaning towards Lino

I'm looking forward to Sunday because I'll be learning to Lino Print at a workshop run by Knit With Attitude in Stoke Newington. I have to admit, I'm not a knitter. I've tried, but I just can't get the hang of it (I suppose that's a challenge for another day!). However, I heard about the workshop through Craft Guerrilla's facebook page a few weeks ago. 

I assume that we'll be able to carve our own Lino design for printing, so I've been working on the design of a li'l owly chap sitting on a branch.